In this guide, we’ll show you how to update drivers in Windows 10. But first, you need to understand exactly what a driver is. Essentially, it’s a piece of software that allows your computer’s components to work together and be recognized by Windows.
Why is it so important to pay attention to these drivers? If they become corrupted or out of date, problems can arise – from crashes and stability issues to sluggish performance and peripherals no longer functioning. When things start going wrong with components in your computer – your PC stops connecting to Wi-Fi, for example – updating your drivers should be one of the first things you try.
Worry not – it’s not as complicated as it sounds. Let us guide you through the steps for keeping your drivers up to speed in Windows 10.
1. Create a restore point
Before you get started, make sure to create a restore point. This ensures that you can go back, in case updating a driver causes problems for your computer. It only takes a minute, but can save you a lot of time and effort down the line.
To create one, click Start, type “Create a restore point” and select the top result. Make sure that ‘Protection’ is enabled for the drive you wish to create a restore point for, select the drive, then click ‘Create’. Give it a name, click ‘Create’, and wait for it to finish.
2. Windows Update
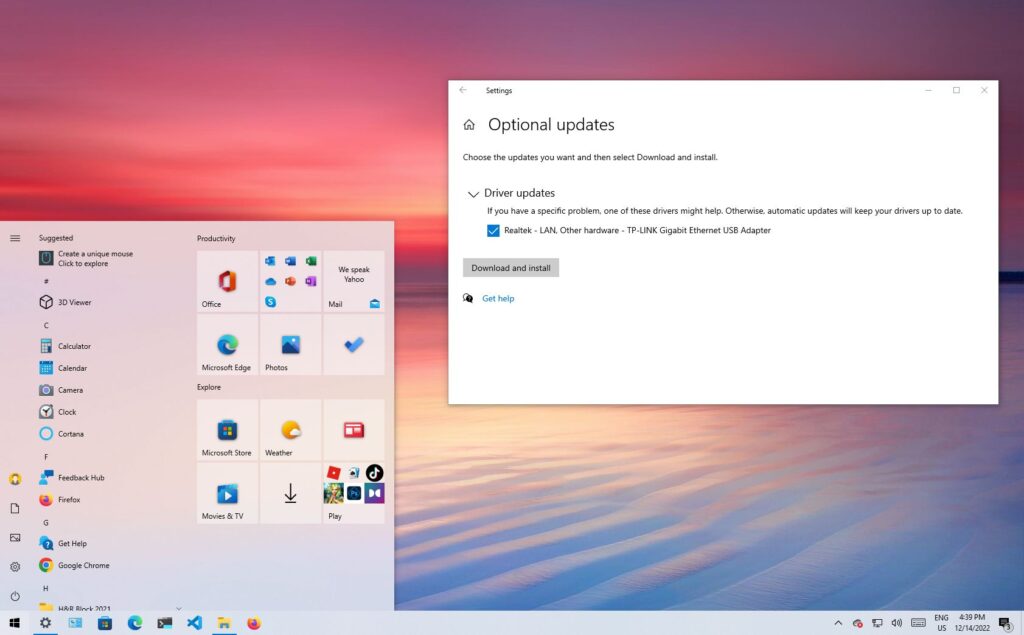
The first way to update your drivers is to use Microsoft’s built-in tool, Windows Update. Go to Settings > Update & Security > Windows Update, and click “Check for updates.” If any updates are found, Windows will download and install them.
This is good when you need to do a general check of your drivers, as well as getting updates for the operating system itself. However, if you know the specific driver that needs updating, there could be a quicker way to upgrade it – this leads us to…
2. Device Manager
The Device Manager is a way to quickly view all of the components that make up your computer, and update their drivers if necessary.
For instance, if your Wi-Fi seems to be acting up, you can find your Wi-Fi adapter in Device Manager and update its driver from there.
In this example, open the Start menu and type “Device Manager,” then click the first result. Scroll down to “Network adapters” and click the arrow to open the full list. Right-click the wireless adapter, click “Update driver,” then click “Search automatically for updated driver software.”
3. Getting drivers from the manufacturer’s website
At times, it makes sense to go directly to the manufacturer’s website to download the latest drivers, especially so if you have several components from the same company that all need updating.
Go to the company’s support section and download the relevant driver. Now load up Device Manager from the previous step, right-click the component that needs updating, and click “Update driver.”
This time, click “Browse my computer for driver software” and navigate to the folder containing the driver (making sure to tick ‘Include subfolders’).
4. Nvidia graphics drivers
While most drivers focus on improving stability and performance, graphics drivers see more regular updates, with drivers often being tailored for specific games. Depending on your graphics card, there will be different ways to update its drivers.
We’ll start with Nvidia graphics cards. First, open up Nvidia’s GeForce Experience program, then click Drivers in the top-left corner. If there is a new driver, you will see an option to download it.
Nvidia gives you an option to perform a fresh installation – this will erase your previous settings, but can help if you’re having issues installing the new driver.
5. AMD graphics drivers
If you have an AMD graphics card, the process is a little different. Right-click on your desktop, then click AMD Radeon Settings.
When the program loads, look to the button in the bottom left. If new graphics drivers are available, it will say “New Update.” If it says ‘Updates’ with a tick next to it, then you’re up to speed.
Click the button to see which graphics driver you currently have installed. Click “Check for Updates” to see what is available; if a new driver is ready, click the name of it, then either “Express Upgrade” for a quick installation or “Custom Upgrade” to configure it.
6. Installing graphics drivers manually
As in step 3, you can download and install graphics drivers manually from the manufacturer’s website. However, the installation process is slightly different when it comes to graphics drivers compared to those for other components.
You’ll need to go to the specific website of the graphics card maker. For instance, if you have an Nvidia card made by Gigabyte, try going to the Gigabyte website first, instead of Nvidia’s site. Navigate to the download or support section, download your driver, and double-click the installer file to get started.
7. Reinstall a troublesome driver
Sometimes, drivers just don’t install properly. Even when it seems everything should line up and go according to plan, you can still come across a critical error. Luckily, there is a solution, and it’s simple to implement.
Load up Device Manager, find the component that’s giving you grief, and right-click on it. In the list of options, select “Uninstall device,” then reboot your PC. When your computer loads up again, Windows will attempt to reinstall the driver, and this could solve the problem.
If that still won’t work however, try downloading and running the Windows Update Troubleshooter from Microsoft’s website. Once it’s finished, update the driver again.
8. Try a third-party program
There is a whole host of third-party programs available that promise to find and update old drivers on your Windows PC. There are plenty of free options out there, with others charging for larger databases of drivers and extra features.
Make sure you do your research before plumping for a program, as some are bloated with lots of unnecessary extras, for example.
Making sure you regularly check Windows Update and Device Manager should preclude needing an additional program, but they can be worth it if you want the added convenience.
9. How to check if drivers installed properly
Now that you’ve installed the necessary drivers, there’s one final step to take: check that it all works as intended. It’s important to make sure the driver installed correctly so you know any issues have been fixed and you can rest assured that you won’t run into any problems later on.
Open the Device Manager and, as before, navigate to the component whose driver has just been updated. Right-click on it, then click Properties.
In the new window, click the Driver tab, then check the “Driver Date” and “Driver Version” fields. If the date and version line up with the details for the driver you installed, you know everything went smoothly.
Culled from: Techradar